Before you can work on your photos, you need to understand how to view them at different sizes.
By default, all images open in "Best-Fit" mode inside the Work Area. This means if the image is larger than the available Work Area, FotoFinish will zoom out until the image fits. However if the image is smaller than the available space in the Work Area, the image will open at 100% (its actual pixel size).
You can change the zoom level either by using the Zoom
Tool ![]() on the toolbar or by choosing one of the options in the View
menu. You can choose one of the presets like 25%, 100%, or 400%, or set a
custom level by clicking on Custom. Changing the zoom level only changes
how the image is displayed on your screen. It does not affect the published
output of the image.
on the toolbar or by choosing one of the options in the View
menu. You can choose one of the presets like 25%, 100%, or 400%, or set a
custom level by clicking on Custom. Changing the zoom level only changes
how the image is displayed on your screen. It does not affect the published
output of the image.
To get a feel for how big your image will be when printed, choose View at Output Size. This displays your image at the size it will be if you print it at actual size.
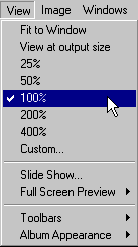
View options
From the View menu, you can also view your image in a Full Screen Preview.
Choose View at Current Size from the Full Screen Preview sub menu to view an open image at the current zoom level. If you are zoomed in to 400%, the Full Screen Preview will view at 400%. Scroll through an image in the full screen preview using the arrow keys; to scroll quickly hold down the Shift key while arrowing in any direction.
Choose Scale to Fit Screen from the Full Screen Preview submenu to view an open image proportionally scaled to fill the screen. This mode will scale the image up or down to fill the screen, but will not crop.
To exit the Full Screen Preview mode, click the right-mouse button or type the Esc key.